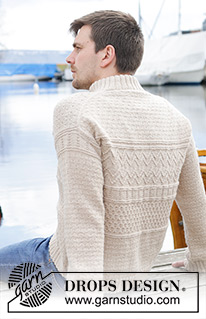
Введение
DROPS 233-24
varietysweater
DROPS Design: Pattern li-155
Yarn group B
Materials & Sizes
SIZES
S - M - L - XL - XXL - XXXL
YARN
DROPS LIMA from Garnstudio (belongs to yarn group B)
700-800-850- 950-1050-1150 g colour 0206, wheat
Or use:
DROPS KARISMA from Garnstudio (belongs to yarn group B)
700-800-850- 950-1050-1150 g colour 77, light oak
NEEDLES
DROPS CIRCULAR NEEDLE SIZE 4 MM: Length 40 cm and 80 cm.
DROPS CIRCULAR NEEDLE SIZE 3 MM: Length 40 cm and 80 cm.
DROPS DOUBLE POINTED NEEDLES SIZE 4 MM.
DROPS DOUBLE POINTED NEEDLES SIZE 3 MM.
DROPS CABLE NEEDLE – for cables.
The technique MAGIC LOOP can be used – you then only need circular needle of 80 cm in each size.
KNITTING TENSION
21 stitches in width and 28 rows in height with stocking stitch = 10 x 10 cm.
NOTE: Needle size is only a guide. If you get too many stitches on 10 cm, change to a larger needle size. If you get too few stitches on 10 cm, change to a smaller needle size.
You might also like...
Men Men's Jumpers Classic Texturesassembly free double neck european shoulder relief round neck top down
Pattern instructions
Keep the screen on while knitting
Tools
PATTERN
See diagrams A.1 to A.6. The diagrams show all rows in the pattern from the right side.
INCREASE TIP FROM THE RIGHT SIDE
Increase towards the left AFTER MARKER:
Use left needle to pick up yarn between 2 stitches from row below, pick up yarn from the front and knit in the stitch loop that is on the back of the needle.
Increase towards the right BEFORE MARKER:
Use left needle to pick up yarn between 2 stitches from row below, pick up yarn from the back and knit in the stitch loop that is on the front side of the needle.
INCREASE TIP FROM THE WRONG SIDE
Increase towards the right AFTER MARKER:
Use left needle to pick up yarn between 2 stitches from row below, pick up yarn from the back and purl in the stitch loop that is on the front side of the needle.
Increase towards the left BEFORE MARKER:
Use left needle to pick up yarn between 2 stitches from row below, pick up yarn from the front and purl in the stitch loop that is on the back side of the needle.
DECREASE TIP (for sleeves):
Decrease 1 stitch on either side of the marker-thread as follows: Work until there are 3 stitches left before the marker-thread, knit 2 together, knit 2 (marker-thread sits between these 2 stitches), slip 1 stitch knit-wise, knit 1 and pass the slipped stitch over the knitted stitch.
JUMPER – SHORT OVERVIEW OF THE PIECE
The upper part of back piece is worked back and forth with circular needle, top down until the armholes are finished. Stitches are knitted up along each shoulder for the front piece, then cast on for the neck and the front piece continued back and forth with circular needle until the armholes are finished. The front and back pieces are joined and the body is continued in the round with circular needle. Stitches are knitted up around the armholes, the sleeve caps worked back forth, then the sleeves are continued in the round with short circular needle/double pointed needles. The neck is worked to finish.
BACK PIECE
Cast on 39-39-43-43-47-47 stitches with circular needle size 4 mm and DROPS Lima or DROPS Karisma. Purl 1 row from the wrong side.
Insert 1 marker, inside the outermost 3 stitches on each side. The markers remain inside these 3 stitches onwards.
Work the first row from the right side as follows: Work A.1A, increase AFTER the marker at the beginning of the row – read INCREASE TIP FROM THE RIGHT SIDE, work A.1B 8-8-9-9-10-10 times, A.1C and increase BEFORE the marker at the end of the row – remember INCREASE TIP FROM THE RIGHT SIDE.
On the next row (wrong side) increase in the same way – read INCREASE TIP FROM THE WRONG SIDE.
Continue the pattern and increase both from the right and wrong side a total of 30-34-36-40-42-46 times – work the increased stitches into A.1B, making sure there are at least 3 stocking stitches outermost on each side. REMEMBER THE KNITTING TENSION!
NOTE: When A.1A, A.1B and A.1C are finished in height, repeat A.1 in height, with room for 4 more repeats of A.1B in width each time A.1 is repeated.
After the last increase there are 99-107-115-123-131-139 stitches and the piece measures approx. 11-12-13-14-15-16 cm from the cast-on edge.
Continue the pattern until the armholes measure 10-10-10-10-11-12 cm (the piece measures approx. 21-22-23-24-26-28 cm from the cast-on edge mid-back) – finish after a row from the wrong side.
Work A.2 back and forth over all stitches.
When A.2 is finished, work as follows from the right side: 1 stocking stitch, A.3A, A.3B 11-12-13-14-15-16 times, A.3C, 1 stocking stitch. Continue this pattern.
When the armhole measures 19-20-20-21-22-23 cm, cut the strand and place the stitches on an extra needle or thread. The armholes are finished (A.3 is continued on the body).
FRONT PIECE
Start on the right shoulder (when the garment is worn).
Knit up from the right side 30-34-36-40-42-46 stitches inside 1 stitch along the right shoulder on back piece (i.e. knit up 1 stitch in each row along the top edge).
Purl 1 row from the wrong side. Work the next row from the right side as follows (from the armhole):
S, M, XXL and XXXL:
3 stocking stitches, work A.1B until there are 3 stitches left, 3 stocking stitches.
L and XL:
3 stocking stitches, work A.1B until there are 5 stitches left, work the first 2 stitches in A.1B, 3 stocking stitches.
ALL SIZES
Continue the pattern back and forth.
When the piece measures 5 cm from the shoulder, increase 1 stitch for the neck before the 3 last stitches on each row from the right side, remember INCREASE TIP FROM THE RIGHT SIDE! Increase like this a total of 6-6-7-7-8-8 times – work the increased stitches into A.1B, making sure you have at least 3 stocking stitches outermost by the neck. After the last increase there are 36-40-43-47-50-54 stitches. Cut the strand after the final increase from the right side. Place the stitches on an extra needle or thread and work the left front shoulder.
Knit up from the right side 30-34-36-40-42-46 stitches inside 1 stitch along the left back shoulder (i.e. knit up 1 stitch in each row along the top edge).
Purl 1 row from the wrong side. Work the next row from the right side as follows (from the neck):
S, M, XXL and XXXL:
3 stocking stitches, work A.1D until there are 3 stitches left, 3 stocking stitches.
L and XL:
3 stocking stitches, work A.1E until there are 5 stitches left, work the first 2 stitches in A.1E, 3 stocking stitches.
ALL SIZES
Continue the pattern back and forth.
When the piece measures 5 cm from the shoulder, increase 1 stitch for the neck after the 3 first stitches on each row from the right side, remember INCREASE TIP FROM THE RIGHT SIDE! Increase like this a total of 6-6-7-7-8-8 times – work the increased stitches into A.1D/A.1E, making sure you have at least 3 stocking stitches outermost by the neck. After the last increase there are 36-40-43-47-50-54 stitches.
Work the next row from the wrong side as follows: Work pattern as before over the 36-40-43-47-50-54 stitches from the left front piece, cast on 27-27-29-29-31-31 stitches for the neck, work pattern as before over the 36-40-43-47-50-54 stitches from the right front piece = 99-107-115-123-131-139 stitches.
Continue A.1 back and forth until the piece measures 16-16-18-18-19-20 cm from the shoulder – finish after a row from the wrong side as on the back piece.
Insert 1 marker outermost on the armhole, 3-3-4-4-4-4 cm below the knitted up stitches on the shoulder.
Control the length of the garment by folding it at the longest point, innermost on the shoulder and the marker on the armhole, to make sure A.1 matches in length on the front and back pieces. This is important so the pattern matches at the sides when the pieces are joined. Adjust the length of A.1 if necessary.
Work A.2 back and forth over all stitches.
When A.2 is finished, work the next row from the right side as follows: 1 stocking stitch, A.3A, A.3B 11-12-13-14-15-16 times, A.3C, 1 stocking stitch.
Continue this pattern until the piece measures 25-26-28-29-30-31 cm, measured along the armhole (A.3 is continued on the body, finish on the same row as on the back piece so the pattern matches when the pieces are joined).
The pieces are now joined for the body as described below.
BODY
Work pattern as before over the 99-107-115-123-131-139 stitches on the front piece, cast on 6-6-8-8-10-14 stitches (in side under sleeve), work pattern as before over the 99-107-115-123-131-139 stitches from the back piece, cast on 6-6-8-8-10-14 stitches (in side under sleeve) = 210-226-246-262-282-306 stitches.
Finish A.3 in the round – the cast-on stitches under each sleeve are worked in stocking stitch until A.3 is finished.
Work A.4 – AT THE SAME TIME, on the first round increase 0-2-0-2-0-0 stitches evenly spaced = 210-228-246-264-282-306 stitches.
On the next-to-last round in A.4, increase 30-32-34-36-38-38 stitches evenly spaced = 240-260-280-300-320-344 stitches (this is because the pattern contracts the piece).
When A.4 is finished, work A.5 over all stitches. Repeat A.5 in height until the piece measures 41-43-45-46-46-48 cm from the highest part of the shoulder by the neck (A.5 is worked approx. 3-4-4-4-4-4 times in height and the body measures approx. 19-21-21-20-20-20 cm from the cast-on stitches in each side). On the last round in A.5, decrease 28-32-36-36-40-40 stitches evenly spaced = 212-228-244-264-280-304 stitches.
Work A.6 over all stitches.
When A.6 is finished, work A.1B over all stitches and until the piece measures 57-59-61-63-65-67 cm from the highest part of the shoulder by the neck – finish after 2 or 3 rounds of stocking stitch after a purled round. Knit 1 round and increase 40-44-48-52-60-60 stitches evenly spaced = 252-272-292-316-340-364 stitches.
Change to circular needle size 3 mm. Work rib (knit 2, purl 2) for 5 cm. Cast off a little loosely. The jumper measures approx. 62-64-66-68-70-72 cm, measured from the highest point on the front piece.
RIGHT SLEEVE
Use circular needle size 4 mm and knit up, from the right side, 40-42-42-44-46-48 stitches from the bottom of the armhole, up the back piece to the top of the shoulder and 52-54-58-60-62-64 stitches from the shoulder, down the front piece to the bottom of the armhole = 92-96-100-104-108-112 stitches.
Insert 1 marker-thread in the middle of the row – this is used when counting out for the start of the pattern and also to measure from. Start on the wrong side with row 2 in A.4, work back and forth – the marker-thread should match the symbol in A.4.
When the sleeve measures 1-1-2-2-2-3 cm, join the piece and finish the sleeve in the round with short circular needle/double pointed needles. When A.4 is finished, work A.1B.
When the sleeve measures 3-5-3-6-5-2 cm from the join, decrease 2 stitches mid-under the sleeve – read DECREASE TIP.
Decrease like this every 2½-2-2-1½-1½-1½ cm a total of 19-21-22-23-25-26 times = 54-54-56-58-58-60 stitches. Work until the sleeve measures 51-50-48-47-46-44 cm from the join. There is 5 cm left; try the jumper on and work to desired length before the rib. Knit 1 round and increase 18-18-20-18-18-20 stitches evenly spaced = 72-72-76-76-76-80 stitches.
Change to double pointed needles size 3 mm. Work rib (knit 2, purl 2) for 5 cm. Cast off a little loosely. The sleeve measures approx. 57-56-55-54-53-52 cm from the knitted-up stitches.
Sew the bottom of the armhole – see sketch.
LEFT SLEEVE
Use circular needle size 4 mm and knit up from the right side 52-54-58-60-62-64 stitches from the bottom of the armhole and up the front piece, then 40-42-42-44-46-48 stitches from the shoulder down the back piece = 92-96-100-104-108-112 stitches.
Insert a marker-thread in the middle of the row. Now work the sleeve in the same way as the right sleeve.
NECK
Start on one shoulder and knit up from the right side, inside 1 edge stitch, 116 to 136 stitches with short circular needle size 3 mm. The stitch-number should be divisible by 4. Work rib in the round (knit 2, purl 2) for 12 cm.
Fold the neck double to the inside and fasten with 1 stitch at each shoulder.
This pattern has been corrected. Click here to see the correction/s.
Diagram
= knit from right side, purl from wrong side
= purl from right side, knit from wrong side
= between 2 stitches make 1 yarn over. On the next row/round, work the yarn over as follows (to avoid a hole):
From the wrong side: Purl the yarn over in the stitch loop that is on the back of the needle
From the right side: Knit the yarn over in the stitch loop that is on the back side of the needle
(the stitch leans towards the left, seen from the right side)
= between 2 stitches make 1 yarn over. On the next row/round, work the yarn over as follows (to avoid a hole):
From the wrong side: Slip the yarn over from the left needle to the right needle as if to purl, put the yarn over back on the left needle by inserting the left needle into the yarn over from behind (the yarn over is now twisted). Purl the yarn over in the stitch loop on the front side of the needle.
From the right side: Move the yarn over from the left needle to the right needle as if to purl, put the yarn over back on the left needle by inserting the left needle into the yarn over from behind (the yarn over is now twisted). Knit the yarn over in the stitch loop on the front side of the needle (the stitch leans towards the right, seen from the right side)
= knit 2 together
= slip 1 stitch knit-wise, knit 1 and pass the slipped stitch over the knitted stitch
= place 1 stitch on cable needle behind the piece, knit 1, knit 1 from cable needle
= place 1 stitch on cable needle in front of the piece, knit 1, knit 1 from cable needle
= slip 1 stitch knit-wise, knit 2 together and pass the slipped stitch over the knitted-together stitches
= marks the marker-thread on sleeve
= bottom of armhole sewn together: b to B
= pick up stitches for left shoulder at the front (d) along left shoulder at the back (D), pick up stitches for right shoulder at the front (e) along right shoulder back (E)
= knitting direction