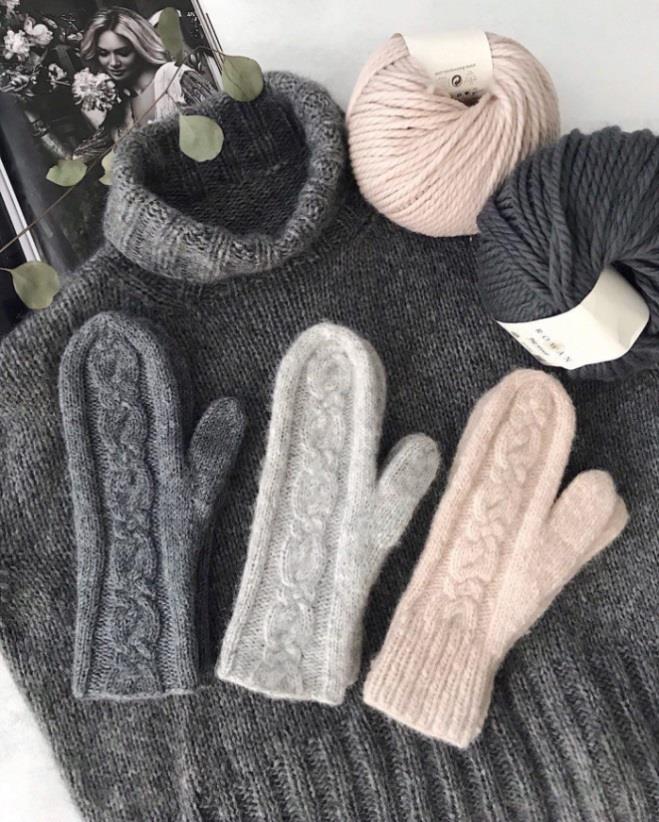
Necessary tools and materials
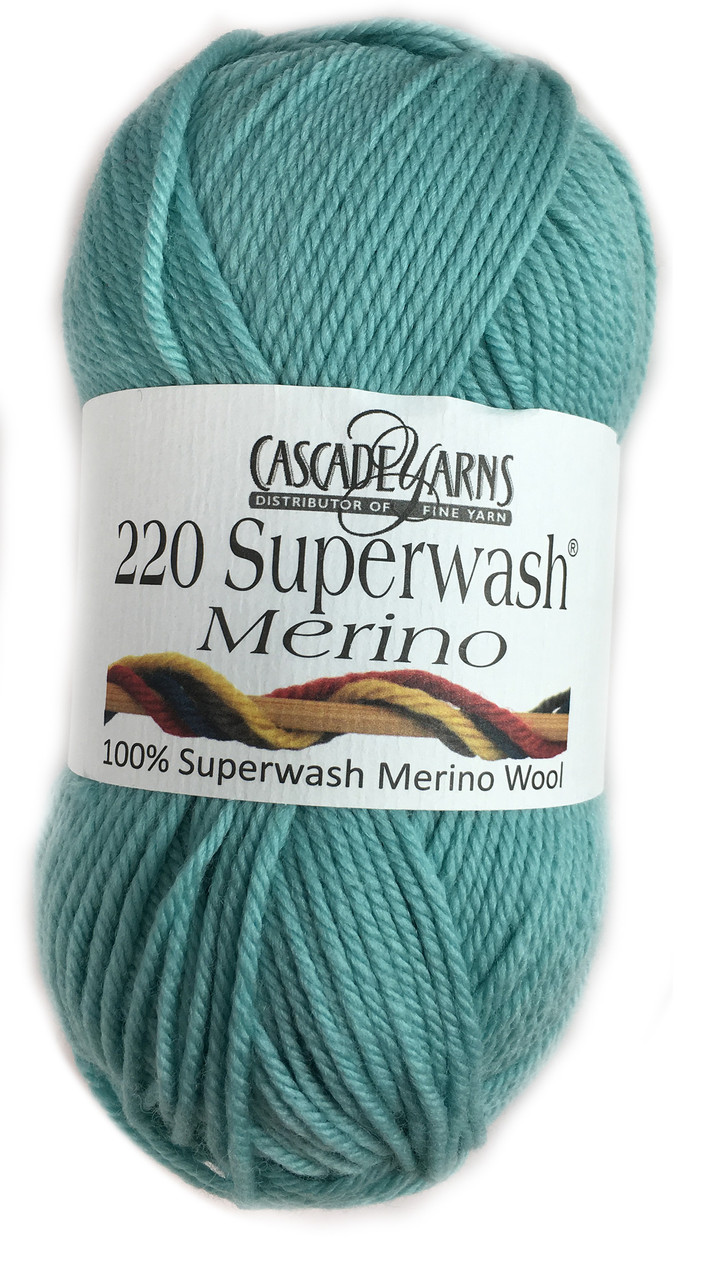
For the work you will need 60–70 grams of yarn with a yardage of 70–100 meters per 50 grams (you can take a little more if you match the gauge indicated below); 3–4 mm needles with a cable length of 80–100 cm (plus DPNs of the same size for knitting the thumb); scissors; tapestry needle; waste yarn in a contrasting color; marker (optional); tape measure for taking measurements and calculating gauge.
Sizes
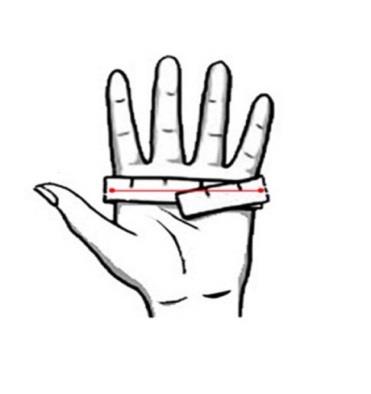
One size — 17–19 cm (palm circumference at the widest part). If the palm circumference is smaller or larger, the number of stitches can be correspondingly decreased or increased by 2 stitches.
Gauge
Gauge was measured in stockinette stitch from the palm side after blocking.
Model without ribbing (yarn 90–110 meters per 50 grams, for example Lima from Drops, Alpaca Ull from Sandnes Garn, Alpaca Peru 100 Lana Grossa, Air from Drops): 13 stitches — 7 cm (that is, 18.5 stitches in 10 cm), 30 rows — 10 cm, needles 3 mm.
Model with ribbing (Drops Nepal yarn): 11.5 stitches — 7 cm (that is, 16.5 stitches in 10 cm), 25 rows — 10 cm, needles 3.5 mm.
The first thing to do before starting work is to knit a swatch and match the gauge recommended above. We all knit differently, some tighter, some looser, so the recommended needles may not suit you. Don't be afraid to use larger or smaller needles — this is normal.

Since the item is worked in the round, it is also more correct to work the swatch in the round. CO 32–36 sts, join in the round, and work in stockinette stitch for about 6 cm in height. Block it: hand wash the swatch at a temperature no higher than 30 degrees with shampoo or a special product and let it dry. Using this swatch, count how many sts you get in 10 cm. If there are more sts than indicated, use larger needles; if fewer, smaller.
Casting on and joining in the round
Hereafter, numbers for the rib model will be given in parentheses and in bold.
Using the classic method, CO 36 (32) sts plus 1 stitch for joining in the round. Move the cast-on sts to the middle of the cable, count 18 (16) sts from the last cast-on stitch, and at this point make a kink in the cable by pulling out a section of it. Slide both parts of the knitting to the needle tips. By hand, transfer one stitch from the left needle to the right needle (the right needle is the one with the yarn tail hanging from it), and pull the left needle slightly out of the stitches. On the right needle, the transferred stitch and the last cast-on stitch are now visible. Pass the last cast-on stitch over the transferred stitch — this joins the knitting in the round. This will be the beginning of the round; for convenience, you can place a marker.
The entire fabric is divided into two parts: palm (left needle) and pattern (right needle). The pattern part consists of 18 (16) sts — these are 14 repeat sts of the pattern according to the chart plus two knit sts on each side in the no-rib model (in the rib model — one knit stitch on each side).
Pattern chart on the back of the hand
Stitch crossings can be worked in two ways — with an extra needle and without it. Choose the option that is convenient for you; I recommend learning crossings without an extra needle — this noticeably speeds up knitting.
Cross 4 stitches to the right. With an extra needle: slip 2 sts to the extra needle and leave at back of work, k2, then return 2 sts from the extra needle to the left needle and knit them. Without an extra needle: slip 2 sts to the right needle without knitting, k2 from the left needle, then from behind the fabric insert the left needle into the first two slipped sts, withdraw the right needle from all four sts, from the front of the fabric pick up with the right needle the two hanging knit sts (from right to left), and knit the two sts that remain on the left needle.
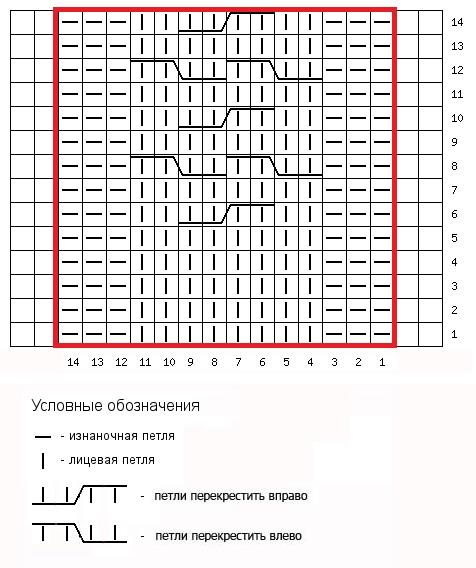
Cross 4 stitches to the left. With an extra needle: slip 2 sts to the extra needle and leave before work, k2, then return 2 sts from the extra needle to the left needle and knit them. Without an extra needle: slip 2 sts to the right needle without knitting, k2 from the left needle, then in front of the fabric insert the left needle into the first two slipped sts, withdraw the right needle from all four sts, behind the fabric pick up with the right needle the two hanging knit sts (from right to left), and knit the two sts on the left needle.
Main part before the thumb
Before the thumb is formed, the palm sts are worked in stockinette stitch, and the part on the right needle is worked in pattern according to the chart.
In the rib model, first work 16 rows (7 cm) in 1×1 rib (k1, p1), then the pattern according to the chart begins from the second row — thumb increases also begin in this same row.
Thumb
In the no-rib model, thumb increases begin in the 20th row (this is one pattern repeat in height plus 5 more rows of the second repeat — according to the chart this is row 6). In the rib model, increases begin immediately after the rib, together with the start of the pattern.
Increases for the right and left mitt are made on the palm side with yarn overs. In both mitts, the first yo is always toward you, the second away from you. In the next row, the yarn overs are worked as twisted knit stitches: yo toward you — through the left leg, yo away from you — through the right leg.
Increases are worked every fourth row: an increase row, then three rows without increases, again increases, and so on.
Increases for the right mitt
The first yo is made three stitches from the beginning of the palm: k3, yo toward you, k1, yo away from you, then knit to end of needle. A triangle forms between the yarn overs, with initially one knit stitch at its apex. After each increase row, the distance between the yarn overs increases by two stitches: 1, 3, 5, 7, 9, 11, 13 knit stitches.
There will be 7 (6) increase rows in total, that is, 14 (12) sts are added. After the last seventh (sixth) increase, work two rows according to pattern. In the next row, k3, slip 12 (10) sts onto waste yarn (this is the future thumb), and knit the remaining sts on the needle.
Note: 14 (12) sts have been increased, and 12 (10) are slipped onto waste yarn. This means 20 (18) sts should remain on the palm, pattern — 18 (16) sts, and total on both needles — 38 (34) sts.
During testing, for some hands 12 sts for the thumb in the no-rib model turned out to be too many. If during the process you realize that 10 sts are enough, make 6 increases instead of 7, and slip 10 sts for the thumb.
Increases for the left mitten
On the left mitten, the increases are made in mirror image. The first yarn over “toward you” is located four stitches before the end of the palm: yarn over “toward you”, k1, yarn over “away from you”, k3. That is, the last three knit stitches always remain “three knit stitches”, and the distance between the yarn overs also increases: 1, 3, 5, 7, 9, 11, 13.
After 7 (6) increases (14 (12) sts), work two rows in pattern without increases, and on the next row slip 12 (10) sts onto spare yarn so that three knit stitches remain at the end of the palm.
After the thumb stitches are set aside, continue knitting the palm in stockinette stitch and the pattern according to the chart.
Decreases
In total, from the beginning of the mitten to the decreases in the version without ribbing, 5 full repeats of the pattern are worked plus two rows of the sixth repeat — that is, the decreases begin on row 73. In the version with ribbing, 3 repeats of the pattern plus 2 rows of the fourth repeat are worked before the decreases.

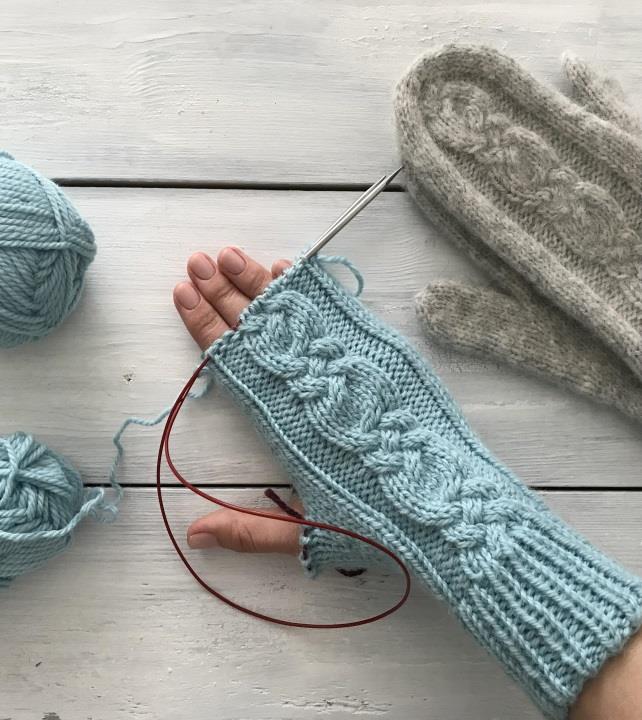
The decreases begin at the middle of the little finger nail. If your hand is shorter and you reach this point earlier, start the decreases earlier according to the following principle: decreases (minus 2 sts on the palm and 2 in the pattern), 2 rows without decreases, decreases, 1 row without decreases, decreases, 1 row without decreases, decreases, and then decreases on every row.
On the palm, one knit stitch remains at each edge: k1, then a left-leaning decrease (ssk), and before the last knit stitch, a right-leaning decrease (k2tog). In the pattern, try to preserve the design to the end: first “hide” the purl stitches under the cable, then decrease stitches in the cable itself, and at the very end round off the mitten by knitting the side knit stitches together with left and right slants.
Decrease methods: “two together” and “two together with a right slant” — knit the stitches together into one as they lie on the needle; “two together with a left slant” — slip two stitches to the right needle, turning them with the other leg forward, return them to the left needle, and knit them together through the back loop.
The decreases proceed gradually. On the first row, leave the edge knit stitches on the palm and decrease inside until there are 14 (12) sts between them, and in the pattern decrease the side stitches and frame the cable by knitting a knit stitch together with a purl stitch on both sides. The next two rows are worked in pattern without decreases. Then the decreases on the palm are repeated, each time reducing the central part by two stitches (12, 10, 8, 6, 4, 2 sts between the edge knit stitches), and in the pattern the cable is decreased sequentially: first a cross to the right while knitting pairs of stitches together, then three-stitch crosses to the left, then further decreasing the knit stitches until the pattern disappears.
In the version with ribbing, the last decrease row will be the one in which 2 sts remain on the palm between the edge knit stitches (pattern: ssk, k2, k2tog).
At the end, 6 sts should remain on the palm and 4 sts in the pattern. Cut the yarn tail, thread it through all the stitches on the needles, and pull the mitten closed.
Thumb
Transfer the stitches from the spare yarn to the needles so that the first needle has 8 (7) sts and the second has 4 (3) sts (we will cast on 4 more). This arrangement is convenient for knitting with the Magic Loop method. If you are knitting on DPNs, distribute the stitches as follows: first needle — 6 sts, second — 5, third — 5 (in the version with ribbing — 5, 5, 4).
Take a new strand of yarn, leaving a free tail of 20–25 cm (we will use it later to sew up the holes that inevitably form when casting on the thumb stitches).
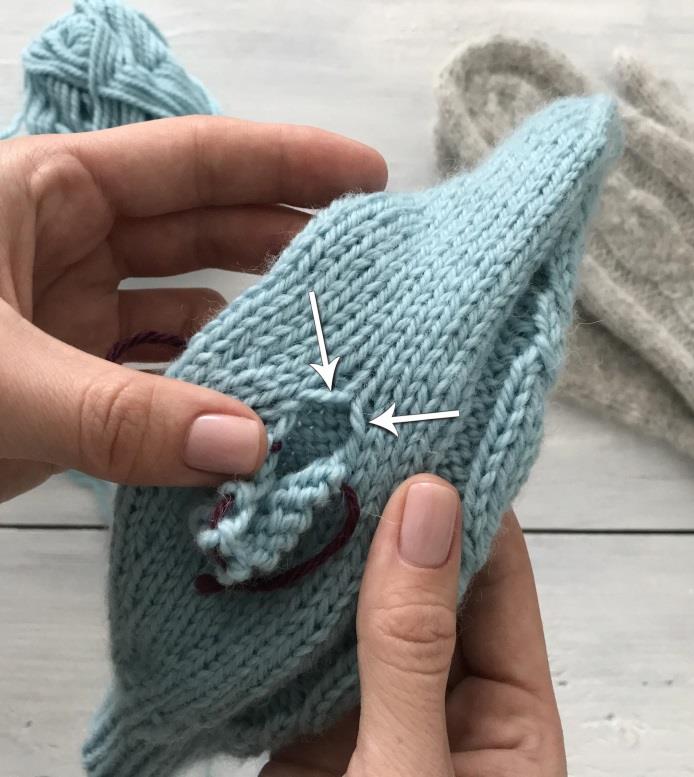
Cast on the new stitches by inserting the needle under and above the “large loops” (the first large loop on the left, the second on the right): into the stitch under the first large loop, into the stitch above the first large loop, into the stitch above the second large loop, and into the stitch under it. Now there is an equal number of stitches on the needles. Mark the beginning of the round here.
Knit the thumb in the round for 16 (13) rows. When knitting with Magic Loop, try to knit slightly looser, otherwise the difference in gauge between the mitten and the thumb will be noticeable, and the thumb itself may turn out smaller than needed. Start the decreases when the thumb is almost completely covered (it peeks out by about 1 mm), so you adjust the thumb length to yourself.
Thumb decreases
Divide the stitches into three parts — 6-5-5 (5-5-4) — and at the end of each part knit two together with a right slant (k2tog) until 6 sts remain on the needles. The decreases are repeated on every row, gradually decreasing each part. In the version with ribbing, the work ends earlier — when 6 sts remain.
When 6 sts remain, cut the yarn tail, insert it into a needle, pass it through all the stitches on the needles, and pull the thumb closed.
Assembly and finishing
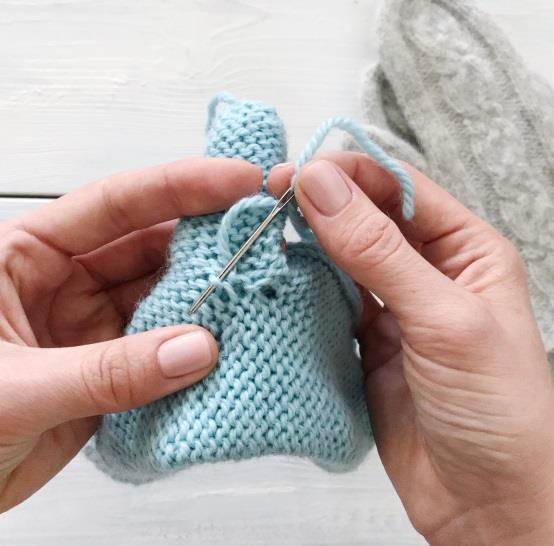
Turn the mitten inside out. You need to close the holes formed after casting on the thumb stitches — there are four of them.
Insert the yarn coming from the first hole into a tapestry needle and pass it through several purl stitches around the hole. Bring the yarn out through the second hole and turn the mitten right side out. Sew up the next two holes, then turn the mitten inside out again and sew up the last hole along the purl stitches. Done — no holes!
Weave in the remaining tails on the wrong side. Wash the mittens by hand at 30 degrees. It is recommended to dry them on special mitten blockers or, after slightly stretching them to fit the hand while wet, try them on and shape them with your hands while they dry.

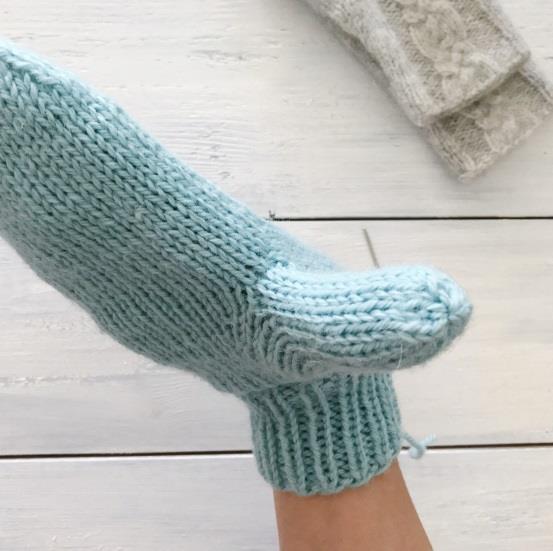
Hooray! The mittens are ready!
Happy knitting!