Введение
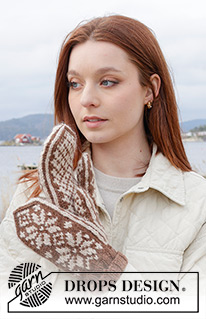
DROPS 242-16
snowflakemittens
DROPS Design: Pattern x-496
Yarn group C or A + A
SIZES: S - M/L
Circumference: approx.20-22 cm. Length: approx. 22-24 cm.
Materials & Sizes
YARN
Colour alternative 1:
DROPS NEPAL from Garnstudio (belongs to yarn group C)
100-100 g colour 7139, grey green
50-50 g colour 8915, chalk
Colour alternative 2:
DROPS NEPAL from Garnstudio (belongs to yarn group C)
100-100 g colour 8917, walnut
50-50 g colour 0100, off white
NEEDLES
DROPS DOUBLE POINTED NEEDLES SIZE 3.5 MM.
DROPS DOUBLE POINTED NEEDLES SIZE 3 MM.
The technique MAGIC LOOP can be used – you then only need 80 cm circular needle in each size.
KNITTING TENSION
20 stitches in width and 27 rows in height with stocking stitch = 10 x 10 cm.
NOTE: Needle size is only a guide. If you get too many stitches on 10 cm, change to a larger needle size. If you get too few stitches on 10 cm, change to a smaller needle size
You might also like...
Women Accessories Gloves & Mittens Gift Ideas Mittens Nordic Gloves & Mittenscolourwork nordic star
Pattern instructions
Keep the screen on while knitting
Tools
PATTERN
See diagrams A.1 to A.4. Choose diagram for your size.
MITTENS – SHORT OVERVIEW OF THE PIECE
The piece is worked in the round with double pointed needles.
RIGHT MITTEN
Cast on 40-44 stitches with double pointed needles size 3 mm and DROPS Nepal, using colour grey green/walnut. Work rib in the round (knit 2, purl 2) for 6-7 cm. Change to double pointed needles size 3.5 mm and continue with stocking stitch according to diagrams A.1 and A.2 (diagram A.2 is worked over the grey squares in A.1 = thumb).
REMEMBER THE KNITTING TENSION!
When A.2 is finished you have increased 8 stitches (11 stitches in A.2). On the next round, place the A.2 stitches on a thread and cast on 3 stitches (as shown, above the 3 grey stitches in A.1). When A.1 is finished, cut the strand, pull it through the remaining stitches, tighten and fasten well.
THUMB
Place the 11 stitches back on double pointed needles size 3.5 mm and knit up 9 stitches behind and to each side of the thumb where the 3 stitches were cast on. So this is neat, knit up and increase stitches as follows: Work A.3 over the stitches on the needles. Then knit up 1 stitch with colour grey green/walnut, make 1 yarn over with colour chalk/off white, knit up 1 stitch with colour chalk/off white, make 1 yarn over with colour chalk/off white, knit up 1 stitch with colour grey green/walnut, make 1 yarn over with colour chalk/off white, knit up 1 stitch with colour chalk/off white, make 1 yarn over with colour chalk/off white, knit up 1 stitch with colour grey green/walnut. This is the first round in A.3 finished. On the next round knit the yarn overs twisted as shown in round 2 of A.3. When A.3 is finished, cut the strand, pull it through the remaining stitches, tighten and fasten well.
LEFT MITTEN
Work in the same way as the right mitten but according to diagram A.4 instead of A.1.
Work A.2 in the same way as for the right mitten but on the opposite side (the grey squares in A.4). When A.4 is finished work the thumb in the same way as for the right mitten.
Diagram
= colour off white/chalk
= colour grey green/walnut
= decrease 1 stitch towards left: Slip next stitch knit-wise, knit 1 with colour grey green/walnut, pass slipped stitch over knitted stitch
= decrease 1 stitch towards right: Knit 2 together with colour grey green/walnut.
= decrease 2 stitches: Slip 1 stitch knit-wise, knit 2 together with colour grey green/walnut, pass slipped stitch over knitted-together stitches.
= thumb-gusset worked here (A.2)
= make 1 yarn over with colour grey green/walnut, which is knitted twisted on next round to avoid a hole