
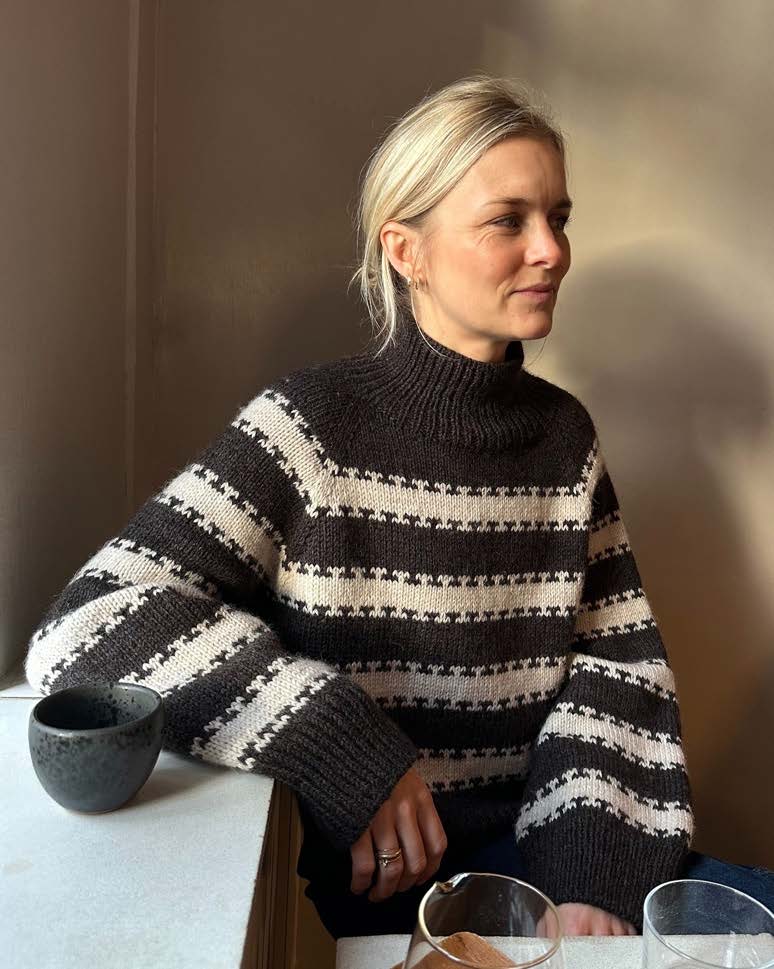
The KEY sweater is worked top down with raglan increases. After the neckline ribbing, short rows are worked to shape the neckline. The body and sleeves are worked in the round and finished with ribbing. The pattern consists of two-color stripes worked in jacquard.
Gauge and tools
Gauge: 24 rows = 10 cm in jacquard and stockinette stitch on 4.5 mm needles (the number of stitches per 10 cm was not preserved in the original PDF — be sure to knit a gauge swatch).
Circular needles: 4 mm / 40 and 80 or 100 cm; 4.5 mm / 40, 60 and 80 or 100 cm. Double-pointed needles 4 mm and 4.5 mm (or use the Magic Loop technique).

Ease and size selection
The Key sweater has about 25 cm of ease: the sweater circumference is approximately 25 cm larger than the bust circumference. Measure yourself before starting to determine the required size. For example, if your bust circumference is 86 cm, size XS will fit: the bust circumference of the finished sweater will be 111 cm, which gives a positive ease of 25 cm.
Jacquard pattern chart
The jacquard pattern chart and its key are given at the end of the instructions. The chart is read from bottom to top and from right to left. The repeat is worked as many times as the number of stitches on the needles allows.
Color dominance
When knitting with two colors, one of them is dominant, that is, more prominent. For the KEY sweater, it is recommended to use the stripe color as the dominant one.
Raglan increases
Increases are worked leaning to the right (M1R) or to the left (M1L).
- M1R (on the RS): insert the left needle under the strand between two stitches from back to front and knit it. On the WS, work in the same way, but purl it.
- M1L (on the RS): insert the left needle under the strand between stitches from front to back and knit it through the back loop (twisted). On the WS, insert the needle from back to front and purl it.
Instructions
Neckline and ribbing
With MC, cast on stitches on 4 mm / 40 cm circular needles using the Italian method. Work 2 rows of tubular ribbing: in the first row, alternate 1 knit and 1 stitch slipped purlwise with the yarn in front; in the second, 1 stitch slipped with the yarn in back and 1 purl. Then join the knitting in the round, mark the beginning of the round with a marker, and work 10 cm in 1x1 ribbing. After that, change to 4.5 mm / 40 cm needles, knitting the ribbing stitches onto the new needles.
Yoke and short rows
The yoke is worked in stockinette stitch. To shape the neckline, short rows are worked, with the turns first located on the sleeves and then on the front. As you knit, change to longer needles (4.5 mm / 60 or 80 cm) to accommodate the growing number of stitches.
Place stitch markers on both sides of the raglan lines — 3 stitches for each line. A total of 8 markers will be needed. The beginning of the round is at the transition between the right sleeve and the back. Note that the stitch distribution is asymmetrical: there are fewer stitches on the back than on the front — this will even out after the short rows.
Work the short rows, for example, using the German short rows technique. First work the turns on the sleeves: starting from the BOR marker, knit the raglan line stitches, work an M1L increase, knit one sleeve stitch, and turn the work. On the purl row, purl to the marker, work an M1R increase, then purl to the next marker, again an M1L increase, knit the raglan line stitches and one more sleeve stitch, turn. Continue similarly, each time turning 3 stitches after the last turn, until all sleeve stitches are included. Then work turns on the front, similarly, gradually including the front stitches.
After completing the short rows, knit in rounds in stockinette stitch from the BOR marker located between the right sleeve and the back. In every second round, work raglan increases: 3 knit stitches of the raglan line, marker, M1L, knit to the next marker, M1R, marker — repeat from * to * for all four raglan lines (8 increases in the round).
Jacquard pattern
After several rounds have been worked, begin working the jacquard chart, starting from the beginning of the round and continuing the raglan increases following the pattern. Follow the chart given at the end of the instructions. Continue knitting with increases in every second round. When the number of sleeve stitches reaches the required number, stop increasing on the sleeves and continue increasing only on the front and back pieces: 3 knit stitches of the raglan line, marker, knit to the marker, marker, 3 knit stitches of the raglan line, marker, M1L, knit to the marker, M1R, marker — repeat from * to * 2 times (4 increases in the round).
Dividing for body and sleeves
When the yoke reaches the required length, divide the stitches: starting from the beginning of the round, leave the front and back stitches on the circular needles, and transfer the sleeve stitches to waste yarn. In the underarm area, cast on 3 new underarm stitches on each side using the backward loop cast-on, knit the front stitches, then cast on another 3 underarm stitches. Thus, the body stitches are joined in the round, and the sleeve stitches wait their turn.
Body
Knit the body in the round on 4.5 mm / 80 or 100 cm circular needles in stockinette stitch with the jacquard pattern. Try on the sweater as you knit. Make sure to finish on one of the main color stripes of the pattern — these are rows 11–20 and 31–40 of the chart. Then change to 4 mm / 80 or 100 cm needles and knit 9 cm in 1x1 ribbing. Before binding off, work tubular ribbing: knit 2 rows (1 knit, 1 slipped purlwise with the yarn in front; then 1 slipped with the yarn in back, 1 purl) and bind off the stitches using the Italian method with a needle.
Sleeves
Knit the sleeves in the round on 4.5 mm / 40 cm circular needles or on DPNs. Pick up the sleeve stitches from the reserved stitches and from the underarm stitches, join in the round, and place a BOR marker after the first 3 (3) 3 (3) 7 (7) 7 (7) 7 underarm stitches. Knit in stockinette stitch with the jacquard pattern until the sleeve length is 33 cm or the desired length. Finish on one of the main color stripes of the pattern (rows 11–20 and 31–40 of the chart). Then change to 4 mm needles and knit 9 cm in 1x1 ribbing, then 2 rows of tubular ribbing, and bind off the stitches using the Italian method, as on the body. Knit the second sleeve in the same way.
At the end, weave in all yarn ends.
Chart for all sizes
The chart uses two colors: the main color (white square) and the stripe color (colored square).

Abbreviations
- k — knit stitch
- p — purl stitch
- M1R — make 1 right (see description above)
- M1L — make 1 left (see description above)
- BOR — beginning of round marker
- RS — right side
- WS — wrong side
- st — stitch

Finished measurements
Below are the finished sweater measurements in centimeters for each size.


- XXS: bust circumference 107 cm; length excluding neckline edge 51 cm; sleeve length along the inner seam 42 cm; sleeve circumference 40 cm; armhole depth 26 cm.
- XS: bust circumference 111 cm; length 54 cm; sleeve 42 cm; sleeve circumference 40 cm; armhole depth 27 cm.
- S: bust circumference 116 cm; length 56 cm; sleeve 42 cm; sleeve circumference 40 cm; armhole depth 29 cm.
- M: bust circumference 120 cm; length 57 cm; sleeve 42 cm; sleeve circumference 44 cm; armhole depth 29 cm.
- L: bust circumference 124 cm; length 59 cm; sleeve 42 cm; sleeve circumference 44 cm; armhole depth 29 cm.
- XL: bust circumference 133 cm; length 61 cm; sleeve 42 cm; sleeve circumference 44 cm; armhole depth 30 cm.
- 2XL: bust circumference 138 cm; length 63 cm; sleeve 42 cm; sleeve circumference 47 cm; armhole depth 31 cm.
- 3XL: bust circumference 142 cm; length 65 cm; sleeve 42 cm; sleeve circumference 47 cm; armhole depth 32 cm.
- 4XL: bust circumference 147 cm; length 68 cm; sleeve 42 cm; sleeve circumference 49 cm; armhole depth 33 cm.
- 5XL: bust circumference 156 cm; length 70 cm; sleeve 42 cm; sleeve circumference 49 cm; armhole depth 33 cm.


