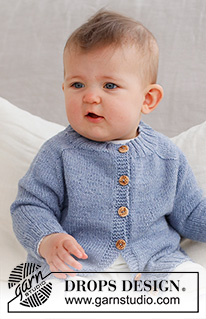
START THE PIECE HERE
JACKET – SHORT OVERVIEW OF THE PIECE.
The neck and yoke are worked back and forth with circular needle, from mid front and top down. Stitches are increased for the saddle-shoulders, sleeves and yoke. The yoke is divided for body and sleeves and the body continued back and forth. The sleeves are worked in the round with double pointed needles.
NECK
Cast on (72) 76-80-84-88 (96) stitches with circular needle size 2.5 mm and DROPS Baby Merino.
Purl 1 row from the wrong side. The next row is worked as follows from the right side: 5 band stitches in GARTER STITCH – read description above, * knit 2, purl 2 , work from -* until there are 7 stitches left, knit 2 and 5 band stitches in garter stitch. Work this rib for (2) 2-2-3-3 (3) cm – remember the BUTTONHOLES on the right band – read description above.
When the rib is finished, knit 1 row from the right side where you increase (10) 14-14-18-18 (18) stitches evenly spaced (do not increase over the bands) = (82) 90-94-102-106 (114) stitches.
Purl 1 row from the wrong side (the bands are knitted).
YOKE
Change to circular needle size 3 mm. Insert 1 marker after the band; the yoke is measured from this marker!
In addition, insert 4 other markers without working the stitches and each marker is inserted between 2 stitches; these markers are used when increasing for the shoulders and should have a different colour to the marker on the neck.
Marker 1: Start mid-front and count (18) 20-21-21-22-24 stitches (front piece), insert the marker before the next stitch.
Marker 2: Count (10) 10-10-14-14 (14) stitches from marker 1 (shoulder), insert the marker before the next stitch.
Marker 3: Count (26) 30-32-32-34 (38) stitches from marker 2 (back piece), insert the marker before the next stitch.
Marker 4: Count (10) 10-10-14-14 (14) stitches from marker 3 (shoulder), insert the marker before the next stitch.
There are (18) 20-21-21-22 (24) stitches left after marker 4 (front piece).
Allow these markers to follow your work onwards.
INCREASES FOR SADDLE SHOULDERS
Read the next section before continuing – on the first row from the right side, increase 4 stitches for the saddle-shoulders as follows:
Work stocking stitch and 5 band stitches in garter stitch on each side.
Increase BEFORE markers 1 and 3 and AFTER markers 2 and 4 – read INCREASE TIP-1. You are only increasing on the front and back pieces. The number of shoulder stitches remains the same.
On the next row (wrong side), increase 4 stitches as follows:
Increase BEFORE markers 4 and 2 and AFTER markers 3 and 1– read INCREASE TIP-2.
You are, therefore, increasing on EACH row but differently from the right and wrong side so the stitches lie neatly.
Continue like this, increasing a total of (10) 10-10-12-12 (12) times = (122) 130-134-150-154 (162) stitches. REMEMBER THE KNITTING TENSION!
After the last increase, the piece measures approx. (3) 3-3-4-4 (4) cm from the marker on the neck. Now increase for the sleeves as follows:
INCREASES TO SLEEVES
Continue with stocking stitch and 5 band stitches in garter stitch on each side.
AT THE SAME TIME, on the next row from the right side increase 4 stitches for the sleeves as follows:
Increase AFTER markers 1 and 3 and BEFORE markers 2 and 4 – remember INCREASE TIP-1.
You are only increasing on the sleeves and the number of stitches on the front and back pieces remains the same. Increase like this every 2nd row (each row from the right side) a total of (10) 12-11-9-9 (10) times = (162) 178-178-186-190 (202) stitches.
The piece measures approx. (9) 11-10-10-10 (10) cm from the marker on the neck. Now increase for the yoke as follows.
INCREASES TO YOKE
SIZE (prematur):
= (162) stitches. Continue with stocking stitch but without increasing until the piece measures 10 cm from the marker on the neck. Go to ‘Divide for the body and sleeves’ below.
SIZES 0/1 - 1/3 - 6/9 - 12/18 months (2 years):
Move the 4 markers so each marker sits in the outermost stitch on each side of the back and front pieces, with 34-32-32-32 (34) stitches between the marker-stitches on the sleeves.
On the next row from the right side increase 8 stitches by increasing both before and after each marker-stitch – remember INCREASE TIP-1.
You are now increasing on the front and back pieces as well as the sleeves.
Increase like this every 2nd row (each row from the right side) a total of 1-3-4-5 (5) times = 186-202-218-230 (242) stitches.
After the last increase, the piece measures approx. 11-12-12-13 (13) cm from the marker on the neck. Continue working until the piece measures 11-12-12-13 (14) cm from the marker.
DIVIDE FOR THE BODY AND SLEEVES
Work the first (26) 29-32-34-36 (38) stitches, place the next (34) 40-42-46-48 (50) stitches on a thread for the sleeve, cast on (4) 4-6-6-8 (8) stitches (in side under sleeve), work (42) 48-54-58-62 (66) stitches, place the next (34) 40-42-46-48 (50) stitches on a thread for the sleeve, cast on (4) 4-6-6-8 (8) stitches (in side under sleeve), work the last (26) 29-32-34-36 (38) stitches.
The body and sleeves are finished separately. The piece is now measured from here!
BODY
= (102) 114-130-138-150 (158) stitches. Continue with stocking stitch and 5 band stitches in garter stitch on each side for a further (5) 8-11-12-14 (16) cm.
Knit 1 row from the right side where you increase (14) 14-18-18-22 (22) stitches evenly spaced (do not increase over the bands) = (116) 128-148-156-172 (180) stitches.
Change to circular needle size 2.5 mm and work as follows from the wrong side: 5 band stitches in garter stitch, * purl 2, knit 2 , work from -* until there are 7 stitches left, purl 2 and 5 band stitches in garter stitch. Continue this rib for 3 cm. Cast off a little loosely.
The jacket measures approx. (20) 24-28-30-33 (36) cm from the shoulder down.
SLEEVES
Place the (34) 40-42-46-48 (50) stitches from the thread on the one side of the piece on double pointed needles size 3 mm and knit up 1 stitch in each of the (4) 4-6-6-8 (8) stitches cast on under the sleeve = (38) 44-48-52-56 (58) stitches. Insert a marker in the middle of the (4) 4-6-6-8 (8) stitches under the sleeve. Start at the marker and work stocking stitch in the round for 1 cm. Now decrease 2 stitches under the sleeve (does not apply to sizes prematur and 0/1 month) – read DECREASE TIP. Decrease like this every 3rd round a total of (0) 2-2-3-4 (4) times = (38) 40-44-46-48 (50) stitches. Continue working until the sleeve measures (4) 8-10-13-15 (18) cm from the division. There is approx. 3 cm to finished length; try the jacket on and work to desired length.
Knit 1 round where you decrease (2) 0-0-2-0 (2) stitches evenly spaced = (36) 40-44-44-48 (48) stitches. Change to double pointed needles size 2.5 mm and work rib (knit 2, purl 2) for 3 cm. Cast off a little loosely The sleeve measures approx. (7) 11-13-16-18 (21) cm from the division.
Work the other sleeve in the same way.
ASSEMBLY
Sew the buttons onto the left band.
This pattern has been corrected. Click here to see the correction/s.
Diagram
= knitting direction
= increases to saddle-shoulders
= increases to sleeves
= increases to yoke